taking back the Newton.
To further the goals of Newton users worldwide, I'm going to begin reviewing older Apple Newton software that is no longer being developed but its use is still viable. I'm going to include screenshots and simple steps to use the software. If enough people find the programs useful then I would like to gather support in an attempt to get the source released back into the wild. The problem being if it hasn't been updated in almost 10 years, it would be harder to contact the developer than it would be to convince them to release the source code. Even if we aren't successful in releasing one piece of software, hopefully I can introduce some of the Newton’s past projects to the Newton users of today.
Bowser - Mini-Review #1
 Bowser is (still) a revolutionary handheld decision-making program utilizing user-created branching pathways. Bowser was last developed in 1995 by Don Miller M.D. (a doctor no less) and is compatible with any Newton with 2MB of space or more. Whatever stopped development between now and then is anyone's guess, but Miller hinted that any further development depended on the Shareware response, so that may be part of the cause. The fact that the program is almost 10 years old doesn't change its effectiveness as a tool for use in today’s world. Whether you are following mandated guidelines for medication in the field of medicine (as Miller originally planned), trying to find the root of the problem in technical support, or are in any kind of decision making environment, Bowser can be of help to you. Now, on with the mini-review . . .
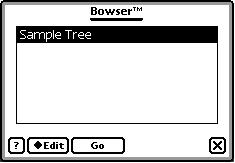
 When you first start Bowser, it brings you to a screen where you are able to choose an existing Bowser tree or begin to create a new one on your own. The window shows the available tree. Miller included a Sample Tree to demonstrate the process one would use with Bowser. Also of note is the ? (question mark) brings up an About screen. An excellent addition to the About screen is the ability to click on the picture to have it remove all additional files created by Bowser, tucked neatly out of accidental reach while allowing easy access to total removal. The Edit menu allows you to delete, modify, and create new Bowser trees while the Go menu begins the decision making process.
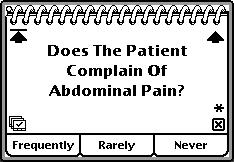
Once you have started your Bowser tree, you are then presented with a question and as many as five different paths to take. In the Sample Tree you see on the right (which I will walk you through its creation in a few moments), the question is posed, "Does the patient complain of abdominal pain?" At this point you would decide which path best fit your situation. But first, let's talk about the extra options that are found on each card. In the upper-left hand corner, the arrow pointing towards the line brings you back to the beginning of the decision-tree. In the upper-right corner, the arrow point up moves you one card backwards in the tree. In the lower-left corner, the screens with a checkmark shows all the different decisions that have been made so far. In the lower right hand corner, the asterisk shows a more complete overview of information concerning the current card. Follow the tabs at the bottom to determine what the best course of action is for the current Bowser tree.
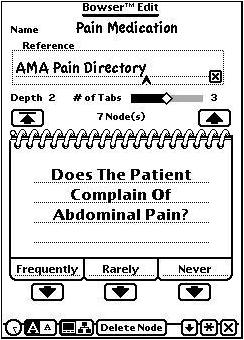
You have quite a few different options to choose from when you are creating a Bowser tree. After naming your tree and entering the reference material for your Bowser tree, you then choose the number of tabs for the current card from as few as 1 to as many as 5. Node(s) refer to the number of user-created cards and Depth shows how far down the tree the card actually is. The cards and tabs are filled out with the question and possible decisions using the Newton's HWR. By clicking on the arrow below each tab, you create a new card linked to the card you are currently on. Bowser also comes with some limited formatting, allowing you to choose two different font styles for the main card. Choose the large A or small A to switch between the two fonts. Instead of creating cards one at a time, you can add existing Bowser trees to a card by selecting the flow chart icon at the bottom. You return to adding single cards by selecting the card icon to the right of the flow chart icon. You delete cards, and all cards linked below that card, by using the Delete Node button. It will prompt you to make certain you want to delete the card before it does remove it from the Bowser tree. The down arrow in the bottom right corner will change the layout of the card, switching between a top alignment and a center alignment. The asterisk opens a new window allowing you to create a more in depth description of the card. With all these options, you are able to create a flow chart that can fit many varied needs. This is just a very skin deep introduction to Bowser and I hope I've been able to introduce you to a little known part of the Newton's history of development.
Once you have started your Bowser tree, you are then presented with a question and as many as five different paths to take. In the Sample Tree you see on the right (which I will walk you through its creation in a few moments), the question is posed,
You have quite a few different options to choose from when you are creating a Bowser tree. After naming your tree and entering the reference material for your Bowser tree, you then choose the number of tabs for the current card from as few as 1 to as many as 5. Node(s) refer to the number of user-created cards and Depth shows how far down the tree the card actually is. The cards and tabs are filled out with the question and possible decisions using the Newton's HWR. By clicking on the arrow below each tab, you create a new card linked to the card you are currently on. Bowser also comes with some limited formatting, allowing you to choose two different font styles for the main card. Choose the large A or small A to switch between the two fonts. Instead of creating cards one at a time, you can add existing Bowser trees to a card by selecting the flow chart icon at the bottom. You return to adding single cards by selecting the card icon to the right of the flow chart icon. You delete cards, and all cards linked below that card, by using the Delete Node button. It will prompt you to make certain you want to delete the card before it does remove it from the Bowser tree. The down arrow in the bottom right corner will change the layout of the card, switching between a top alignment and a center alignment. The asterisk opens a new window allowing you to create a more in depth description of the card. With all these options, you are able to create a flow chart that can fit many varied needs. This is just a very skin deep introduction to Bowser and I hope I've been able to introduce you to a little known part of the Newton's history of development.


