| Newtonscript Tutorial #1 - Hello World |
|
So you want to program your Newton Messagepad, huh? Makes
sense...I'm certain that you love your Newton and what better way to show
it than by writing some pseudo-useless code for it? Well then, I say welcome to
your first step into the world of tomorrow, or more rightly the world of yesterday,
by learning Newtonscript, the language that makes our beloved Original
Green Tablet run. Newtonscript is a high level, object-oriented
proto-language that was developed by Apple for exclusive use as the
backbone of the Newton OS. Essentially, all of the adjectives used in
the previous sentence mean that Newtonscript is compact, fast, and
incredibly powerful on a "limited" machine. Though the Newton
Messagepad does have its known limitations, it can still compete with
any PDA on the market today. The steps we are taking here will assume
you have some previous programming knowledge. I won't guide you through
the basics of programming, but I will move at a pace that should make it
easy to follow along. The backbone of Newton development (no matter what
system you are using, Mac or PC) is the Newton Toolkit. This must be
installed to begin the Newtonscript development process. Newton Toolkit
(also known as NTK) is the professional software development kit once sold by Apple
for several thousand dollars, but is now found free on the internet. If you already
use a Newton on a regular basis, then you probably have visited UNNA.org
numerous times. If not, the Newton Toolkit can be downloaded at
UNNA.org under the development section. |
|
Step 1
Okay, now you have NTK installed, and you have just clicked the Toolkit icon, this is what your screen should look like. You will also need a serial cable connected to your computer to download and test your code. Also, you may need to have SlowDown installed (more information as well as the program itself can be found at the link). The Newton Toolkit allows you to automatically download your program in NTK, without having to use another program to install it on your Newton. 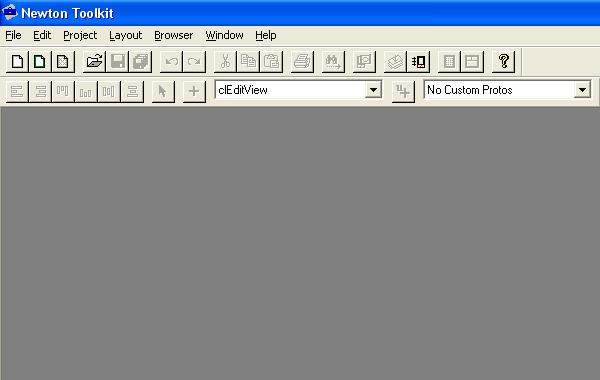
|
|
Step 2
Every new program starts off as a blank project. To start a new project select Project from the menu bar at the top and then New Project... from the drop down menu. If we were about to begin again on a previous project then you would select the option, Open Project . . . 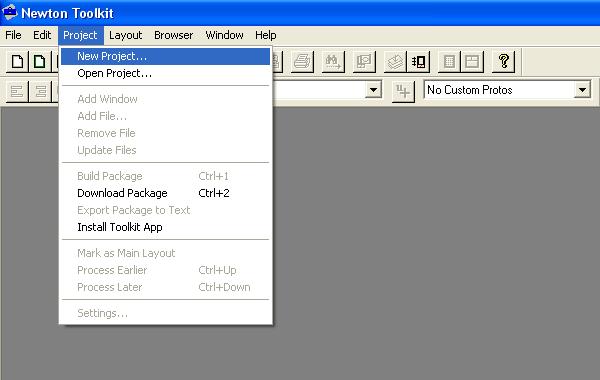 |
|
Step 3
Once you have selected New Project . . . A file browser window appears. Select a location on your computer and name this new project, Hello World.NTK. A project file contains all the different the parts of our program, from the actual source code to the layout files, as well as any graphics or sounds that will be called during the execution of the program. 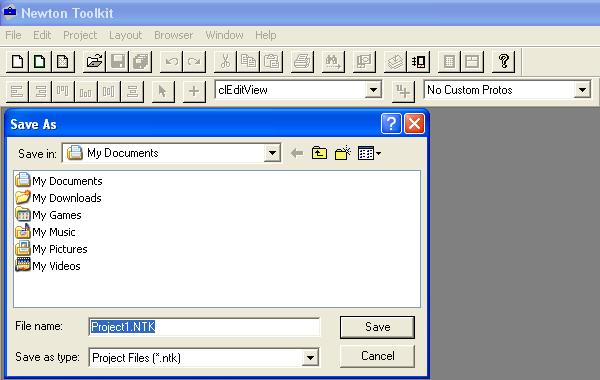 |
|
Step 4
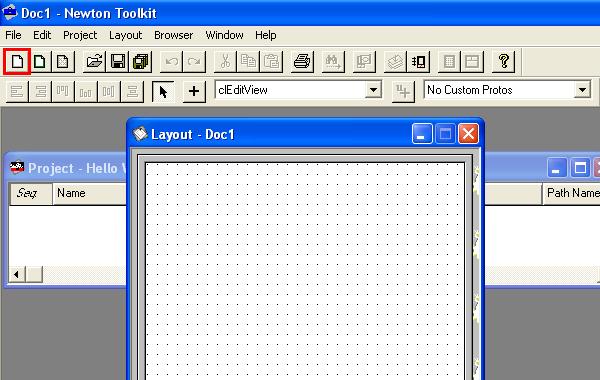
As you can see, you have no files in your project. Let's begin by adding the backbone of Newtonscript development, the Layout. To create a new layout click the button in the top left menu bar, or you can select New Layout from the file menu, or you can use the button combination, Ctrl + N. Let's click the button to create a new layout, the button is highlighted below in red. This button brings up a new blank layout window that will hold your controls (the visual aspects of your program) in place.A layout consists of any number of Newtonscript controls, from simple borders, to multiple choice menu's that accept written ink, this is where there location on the screen would be defined.
|
|
Step 5
For the next few steps we are going to concentrate on the layout window, for this is where the majority of your code will be entered for your programs. Newtonscript programs rely heavily on protos, so heavily in fact that proto means both a noun and a verb to developers. Proto as a noun refers to code segments that are stored in ROM and called on during the execution of a Newtonscript program. All visual items you find in a Newtonscript program are protos; each text input line, each picture button, even the close button found in all programs is a proto. This explains why the Newton is able to do so much with so few resources; instead of having to make multiple calls with multiple commands, Newtonscript sets up something akin to a pointer to a proto, instead of multiple calls, there is just the one command inside the compiled project. Proto becomes a noun when you copy a system proto, and change the values of it's slots. Protoing a proto would is much like cloning or copying a system proto. But letÆs not get too bogged down in semantics until the end of your first program. For the first step of making a Layout for your Newtonscript program choose protoApp from the drop down list (protoApp is highlighted in red). The proto protoApp contains all the basic tools that a Newtonscript program would require; status bar, title, close box, and info button; protoApp is based on the clView class, with two child views, protoTitle and protoStatus. 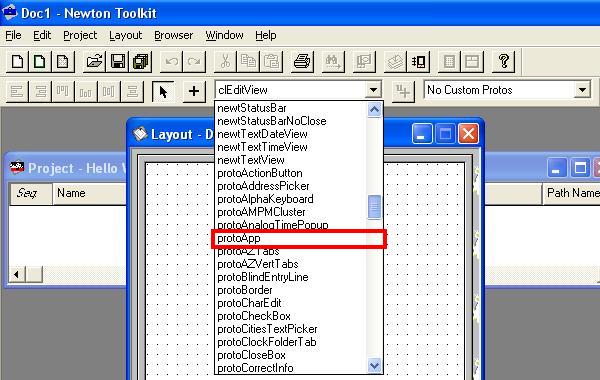 |
|
Step 6
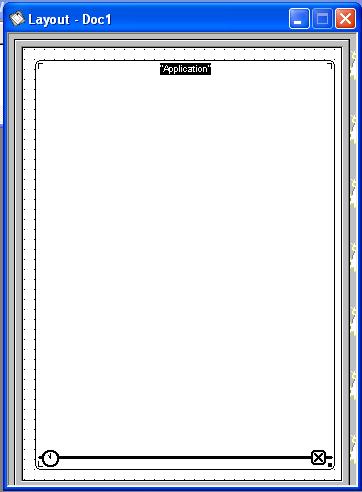
Once youÆve selected protoApp, your cursor changes from a selection tool to a drawing tool. You can now draw out your selected view in your new Layout. Create a protoApp view that almost fills the screen of your layout as shown in the picture below. The protoApp view is the basis for most simple Newtonscript programs, it contains a title, a close box, a status bar as well as a single line border and rounded corners. NTK has a built in preview function so you can check the progress of your program, Ctrl + Y will switch from Layout mode to Preview mode and vise versa. The preview wonÆt always show your layout correctly and the final layout should be checked by downloading your project to your Newton.
|
|
Step 7
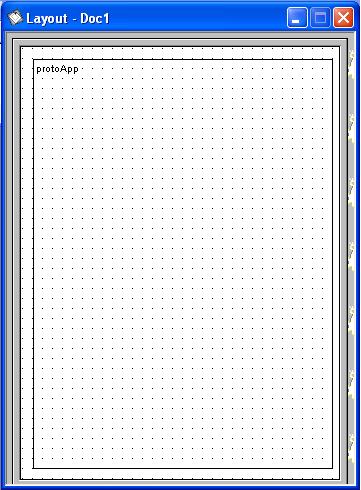
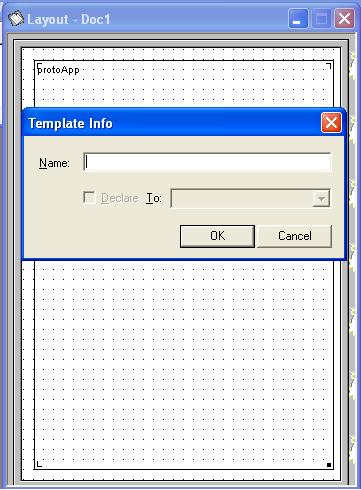
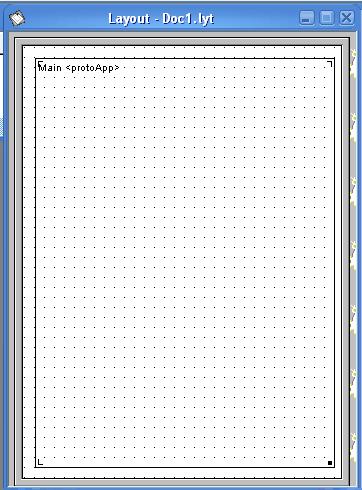
Once you have drawn out your Base view (each program has only one Base view, and every other view must be contained within the Base view) in the layout screen we will adjust the Template Info to name it. Once we have named a view we can reference it and all the views under it that are declared to it. You can access template info by first selecting the view from your layout and then clicking Layout menu>Template Info, or by selecting the view from your layout and then pressing Ctrl + I. The window that pops up allows you to name the view as well as declare your view to another view, allowing for direct access to the view. Once you have opened the Template Info for your base view, as shown in the picture below, name it Main. This protoApp, now called main, will be your base view, each layout has oneŚand only oneŚbase view, this view holds all your other views and a great deal of your programming code. The windows show a layout with the Template Info box open, and once the view has been named the layout reflects the changes that have been made, appearing as Main <protoApp>.
|
|
Step 8 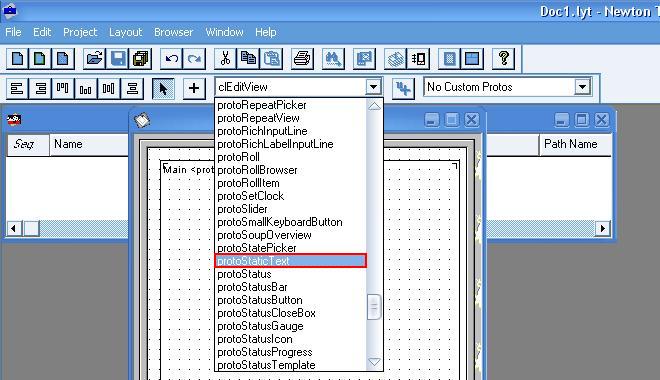
Once you
have named your layout it is then time to start adding the views that
make it a Newtonscript program. For the tutorial project we are working
on we will create a program with a text button that makes ōHello Worldö
appear on the
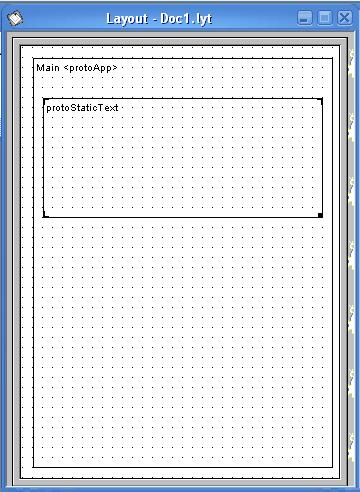
The first view that we will add to our base view Main is, protoStaticText. Go ahead and select this proto from the drop down list. This view is a simple view that does not allow it to be clicked, has no border and displays text, which can be chosen at compile time and changed during run time. Select protoStaticText and draw a view in the Main view roughly 1/3 the height and nearly the entire width of the base view. Once you have drawn out the protoStaticText change itÆs Template Properties so it is named textBox, and is declared to the Main view. |
|
Step 9
Once you have saved the layout, we must then add it to the project file. Choose Add File from the Project menu, then choose the layout HelloWorld.lyt in the open box that appears. The project file will hold all the required files by our program including layouts, install-scripts, remove-scripts, constants' definitions, and user-created protos. All of the different files added to the project are shown in the project window which contains information about each file including name, file type (text, layout, etc.), size, modification date, and path name of the file. 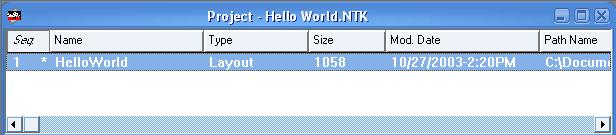
|
|
Step 10 At this point you would be able to build your project and run it on your Newton, but, It would be the most boring program ever, it would do nothing, just sit there waiting to be closed. But, it is a program, and for some of you, it would be your first. Our next step will be to change the attributes, methods, and values of a proto, in our case, the protoStaticText. To change these values double-click the protoStaticText to bring up the Browser window. The browser window will show not only the proto that was double-clicked but also all the protos that are placed under it as well 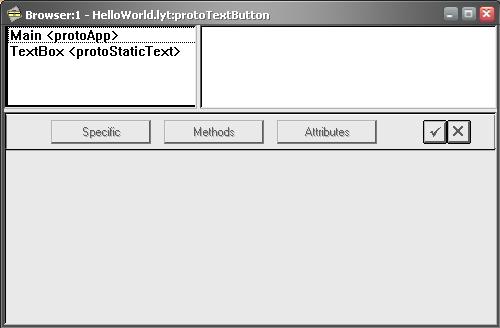
|
|
Step 11 Now that
we have the Browser window open we are going to begin changing the
values of our program. At this point we are going to change just a few
basic
|
|
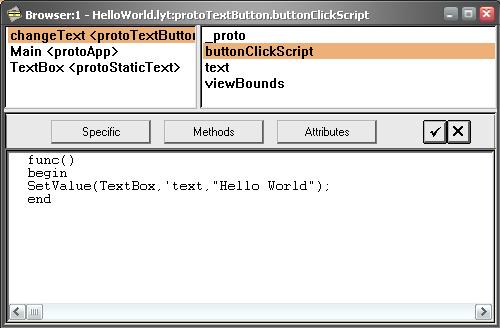
Step 12 Now that we have changed the protoStaticText, letÆs create a protoTextButton. Choose protoTextButton from the drop down listing in NTK. Draw a box underneath the protoStaticText roughly one half the width of the text box. Once you have created the protoTextButton change the Template Info (alt + I) and name the protoTextButton ōchangeTextö. Also, declare the newly named button, changeText, to Main.
Go ahead
and open the Browser window by double-clicking changeText
<protoTextButton>. Once the window is open select the text slot and
change from ōButtonö to ōHello to . . . ō. In the browser window you
will notice a new slot that was unavailable to
Add the following code to protoTextButton > buttonClickScript. SetValue(TextBox,Ætext,öHello Worldö). LetÆs quickly go over the semantics of the SetValue statement. SetValue begins the statement, followed by an open parenthesis which will enclose the particulars of the SetValue statement. Text is the name given to the proto that we are going to change; aTextBox is the name given to the protoStaticText, ætext refers to the slot of that we are changing, in protoStaticText we are changing the text slot; and the last part is the value that the slot is being changed to, "Hello World" will be the new value of the text slot in the protoStaticText. And ōHello Worldö is the value that the text slot of aTextBox <protoStaticText> is going to be changed to. SetValue can be used to change most every part of a slot in your Newton program (change the icon of a protoPictureButton, the font weight or size, etc.). Once the program has been compiled and run, when the button is pressed aTextBox will change from ōHello who?ö to ōHello Worldö.
|
|
Step 13 Now that
we have a full Newton project, letÆs connect the
Once you have the Toolkit.pkg installed, connect your serial cable from your computer to your Newton, then open the Toolkit.pkg on the Newton. Once you have connected the cable, opened the Toolkit.pkg, and have NTK running, press Connect Inspector. At this point, under NTK, click through the Window menu, to Connect Inspector (or you can use Ctrl + K). At this point the Inspector window appears, with options from left to right; connect & disconnect, stop on throws, trace on/off, step trace on/off, and exit break loop. 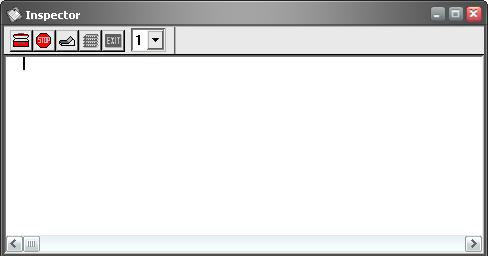
|
 NewtonÆs
screen. The views that you place in your base view can affect any views
that are declared to it or follow the rules of Newtonscript
inheritance. IÆm working on a separate tutorial to discuss the basics
of Newtonscript
NewtonÆs
screen. The views that you place in your base view can affect any views
that are declared to it or follow the rules of Newtonscript
inheritance. IÆm working on a separate tutorial to discuss the basics
of Newtonscript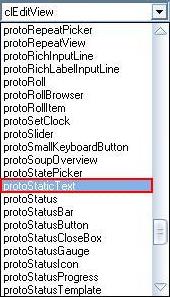 as well as having a short description of the built-in Views that are
provided with NS, until then, inheritance works up the chain, a simple
example would be asking your parents, not your children for money. It
goes up before going down.
as well as having a short description of the built-in Views that are
provided with NS, until then, inheritance works up the chain, a simple
example would be asking your parents, not your children for money. It
goes up before going down.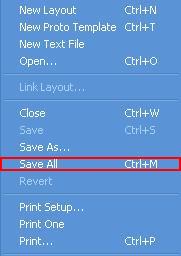 At
this point letÆs save both the project and the layout. Select Save
All from the File menu (or use the keyboard shortcut Ctrl + M).
This will save the layouts, text files and protos in the current
project, prompting you for a save name if one is needed. When the save
dialog appears, save the layout as HelloWorld in the same directory as
the project file. Once you have named the layout, the title bar changes
to reflect the name that it was saved as.
At
this point letÆs save both the project and the layout. Select Save
All from the File menu (or use the keyboard shortcut Ctrl + M).
This will save the layouts, text files and protos in the current
project, prompting you for a save name if one is needed. When the save
dialog appears, save the layout as HelloWorld in the same directory as
the project file. Once you have named the layout, the title bar changes
to reflect the name that it was saved as.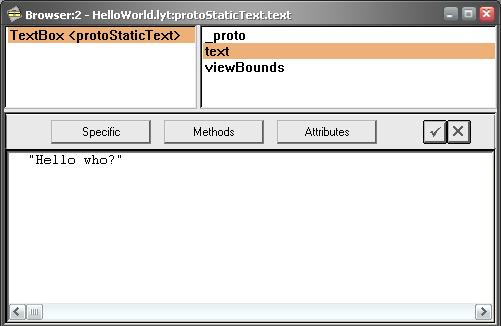 values,
letÆs double-click our protoStaticText to open a browser window. To
begin with the only attributes that are shown are _proto (which is the
proto that you are editing, allowing you to change one proto to
another), text (allowing you to set the text shown during compile time),
and viewBounds (which are the coordinates of the proto in regards to the
base view (which would be our Main protoApp). The three kinds of values
that a could have are Specific (which would include text for a
protoStaticText, or icon for a protoPictureButton), Methods (determine
actions from user interaction, a good example would be the programs
actions when the proto is highlighted, or if an attempt to draw on the
proto is made), and finally Attributes (which cover the way the proto
appears while the program is running). LetÆs select the text slot, once
the text slot has been highlighted the bottom half of the Browser opens
up showing what can be edited on the current slot. LetÆs change the text
slot from ōStatic Textö to ōHello who?ö.
values,
letÆs double-click our protoStaticText to open a browser window. To
begin with the only attributes that are shown are _proto (which is the
proto that you are editing, allowing you to change one proto to
another), text (allowing you to set the text shown during compile time),
and viewBounds (which are the coordinates of the proto in regards to the
base view (which would be our Main protoApp). The three kinds of values
that a could have are Specific (which would include text for a
protoStaticText, or icon for a protoPictureButton), Methods (determine
actions from user interaction, a good example would be the programs
actions when the proto is highlighted, or if an attempt to draw on the
proto is made), and finally Attributes (which cover the way the proto
appears while the program is running). LetÆs select the text slot, once
the text slot has been highlighted the bottom half of the Browser opens
up showing what can be edited on the current slot. LetÆs change the text
slot from ōStatic Textö to ōHello who?ö.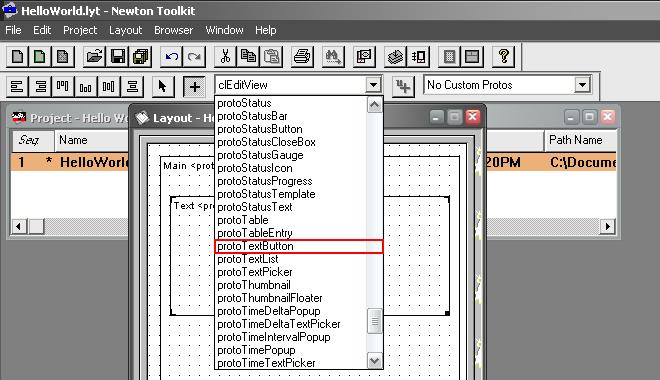
 Text
<protoStaticText>, buttonClickScript. This slot holds the code that is
executed when the button is clicked. Select the buttonClickScript slot
in the browser, the bottom window shows the code that is executed, the
code is in the form of a function. The code that's executed when the
button is pressed is found between the begin . . . end. The code that
will be executed when the button is pressed will change our aTextBox
<protoStaticText> from Hello Who? to Hello World. The code that we will
use to accomplish this is SetValue, SetValue allows us to change the
value of a slot during run-time of your application.
Text
<protoStaticText>, buttonClickScript. This slot holds the code that is
executed when the button is clicked. Select the buttonClickScript slot
in the browser, the bottom window shows the code that is executed, the
code is in the form of a function. The code that's executed when the
button is pressed is found between the begin . . . end. The code that
will be executed when the button is pressed will change our aTextBox
<protoStaticText> from Hello Who? to Hello World. The code that we will
use to accomplish this is SetValue, SetValue allows us to change the
value of a slot during run-time of your application.
 Inspector
to the Newton. The Inspector is a program that connects the Newton to
your computer, allowing your computer to run commands on your Newton, as
well as accept output from the Newton to display on your computer
screen. To connect the Inspector you must have installed the
Toolkit.pkg that is inside your NTK folder to your Newton. This program
will allow you to connect the Newton to Newton Toolkit.
Inspector
to the Newton. The Inspector is a program that connects the Newton to
your computer, allowing your computer to run commands on your Newton, as
well as accept output from the Newton to display on your computer
screen. To connect the Inspector you must have installed the
Toolkit.pkg that is inside your NTK folder to your Newton. This program
will allow you to connect the Newton to Newton Toolkit.